raisin sends messages from the e-mail addresses you specify in your events (for example, from person@yourorganization.com) to donors, participants, contacts, and even to yourself. When e-mails are sent, recipients have spam filters to automatically determine if an e-mail should be delivered, including if an e-mail looks like it was forged by another sender. Sometimes e-mail messages are caught by these filters and never delivered.
The fact that your organization controls your domain name means you can assign permission to -- that is, "authenticate" -- senders, which is sufficient proof for spam filters to allow the message through. Put simply, in the eyes of an email provider, authenticating an email grants permission for a provider like raisin to send a message that's addressed from you.
To increase the chances your electronic messages are actually received, three methods of email authentication are required across all Sender Email Domains (in Message Templates and your Organization Email) that you use on raisin:
- Sender Policy Framework (SPF)
- DomainKeys Identified Mail (DKIM)
- Domain-based Message Authentication, Reporting and Conformance (DMARC)
Important:
Effective February 1, 2024, Google and Yahoo require that all bulk sender emails are authenticated with SPF, DKIM and DMARC.
As a result, we, too, now require that SPF and DKIM authentication and a DMARC policy is published on your domain for all providers you use, including raisin, to ensure your fundraising campaigns to ensure emails are not automatically spammed.
If your domains are not properly signed and validated in raisin, you will not be able to save new email messages in the platform. To validate your domains, follow these steps below.
We will update your Sender Email address to avoid reputational damage to your domain and our application. You will be notified if this occurs.
Using your domain to send emails
The first step in improving email deliverability is to use your organization's domain (e.g. your company.com, yourorganization.org, example.com) when establishing the Sender Email in your Message Templates and your Organization Email. A private domain with a positive reputation is not only more trusted by recipients, but will also allow you or your IT to configure it with the proper authentication standards.
On the contrary, email addresses that use public, free providers like Gmail, Yahoo and Outlook.com should never be set as any Sender Email Address in your account. Doing so will automatically result in emails being spammed and reputational harm.
Configuring your SPF Record
A “Sender Policy Framework” (or SPF) should be established on your e-mail's domain and is the first way to tell recipient e-mail accounts that you have authorized raisin to send emails on your behalf.
To create your SPF record and authorize raisin as a sender, the administrator or IT department of your domain/website should complete the following:
- Create a TXT record that starts with v=spf1
- Follow this tag with any authorized sender IPs or addresses you may have (e.g. MailChimp, Salesforce, Outlook)
- To authorize raisin as a sender, add a directive reading:
a:media2.akaraisin.com
- Define any other modifiers
Be aware: Mistakes in your SPF can be detrimental to all e-mail delivery -- not just from raisin. See here for more on proper syntax.
- To publish your SPF, log into the DNS Control Panel of your domain and visit the zone where TXT records or SPF records are managed. Add the record that was created in the steps above or modify the existing that's already there one so that
a:media2.akaraisin.comis present.
A properly configured SPF should look like something like this:v=spf1 include:spf.protection.outlook.com a:media2.akaraisin.com -all
The SPF is not always defined in the same place, so contact your IT department or domain host if you're unsure where of how it should be set up.
Please note: All domains that send e-mails through the system must be affected -- this includes your organizational e-mail address (found in raisin General Setup), as well as the e-mail addresses set in your events' Message Templates. For example, if the ‘From:’ e-mail address domain in one of your event’s Message Templates (e.g. person@yourevent.com) differs from your organizational address (e.g. person@yourorganization.com), please be sure that raisin is added to the SPF records of both event and organization domains.
Configuring DKIM
Like an SPF, DomainKeys Identified Mail (or DKIM) is an authentication method that allows domain owners to authorize third-parties to send emails on their behalf. DKIM is a bit more complicated than SPF, but is also more effective. Instead of just verifying the sender, a secure, paired key is added to your domain that automatically "signs" emails from their domain, just like a signature on a check or a signature on a letter does, to confirm who wrote it.
To establish DKIM authentication, follow these steps:- Contact your Client Experience Manager requesting a secure DKIM key for the sender domain (e.g. foundationname.com) you wish to authenticate.
DKIM keys are generated uniquely per domain, so if you have multiple Sender Domains for different emails in your account (e.g. foundationname.com and eventname.com), please request keys for all that are applicable.
- A key Name and Value will be shared with you.
- Next, your IT administrator or domain manager should create a new CNAME record in your DNS management console
- In the upper section, enter the Name that was shared with you to the "Host" or "Name" field in your DNS
- In the lower section, enter the Value shared with to the "Value" or "Points to" field
Example: Let's say your domain is foundationname.com and you are provided a Key Name of "samplekey12345-1._domainkey.foundationname" and Value of "sample-2023-00.dkim.value.app".
- In the upper section, requesting Host or Name, enter:
samplekey12345-1._domainkey.foundationname
- In the section requesting Value or Points to, add:
sample-2023-00.dkim.value.app
- Save
The changes will propagate based on the TTL (Time to Live) time you've set when creating the new CNAME. Please wait 48 hours to allow the changes to propagate on your sender domain.
Do you use GoDaddy? Here's some instructions on how to create a CNAME.
Adopting DMARC
Note: A valid SPF Record and DKIM Record are prerequisites for DMARC.
DMARC is a policy or protocol that aligns the results of your SPF and DKIM to the contents of an email. A DMARC policy allows a domain owner to indicate that their messages are protected by SPF and/or DKIM, and tells the recipient what to do if none of these are verified on a particular piece of email, such as marking it as junk mail or rejecting delivery of the message.
When your DMARC Record is published, it will: i) inform email receivers (like Gmail and Yahoo) how to handle messages that fail to align with those protocols; and ii) provide reports with feedback about emails sent by your domain so that you can troubleshoot better -- altogether making the emails you send and receive more legitimate.
Unlike SPF and DKIM where providers like us can share you with specific directives or keys, adopting DMARC is an organizational decision across your domains on how you want to handle email.
Publishing your DMARC record
Domain administrators can set their DMARC policy (syntax as “p=”) to decide what is to do with "non-compliant" email and compiled into a single DMARC Record in your DNS:
- Monitoring (p=none) no impact on mail flows (only DMARC feedback is collected)
- Quarantine (p=quarantine) messages that fail DMARC (move to the spam folder)
- Reject (p=reject) messages that fail DMARC (don’t accept the mail at all)
Google requires that your DMARC policy align with SPF and DKIM. In your DMARC policy, can choose from two alignment modes: strict and relaxed. The aspf and adkim DMARC record tags set the alignment mode:
- Strict alignment (s) means that the sender domain name must exactly match the corresponding d=domainname in the DKIM mail headers.
- Relaxed alignment (r) is the default and allows partial matches
Need help crafting your record? Use this helpful wizard supplied by industry-leader DMARCIAN: https://dmarcian.com/dmarc-record-wizard/
Your policy is then published in your domain as a DMARC Record:
- Log in to your DNS console
- Navigate to the DNS where you’ll be publishing a DMARC record - likely as TXT record
- Most DNS consoles will ask for the following:
- Host Name: This should be:
_dmarc.
Note: the leading “underscore” character is required! - Resource type: This is TXT, as DMARC records are published in the DNS as TXT resources
- Value: Enter the DMARC record itself
- Host Name: This should be:
- Save
Verifying that e-mails are being sent
Understanding that emails may be spammed for a constellation of reasons -- some of which are outside of your control -- ensuring that your domains are properly authenticated and validated will help avoid spammed emails and reputational harm to your domain (e.g. blacklisting). Indeed, even if one of the above methods is not in place, emails sent are likely to be spammed.
It's important to make sure that your domains are properly authenticated. This is true of raisin, and any platform you use to send e-mail messages.
Validate authentication in System Settings
In order to send emails through raisin, the authentication of sender domains must be validated through the System Settings in General Setup of your account. This is a way to ensure that your messages meet Google and Yahoo's standards for SPF and DKIM before you start to send e-mails.
For the reasons above, validation must be performed by all organizations in order to send messages.
Follow these steps in raisin to perform verification:
- Before saving any messages, go to General Setup in the main navigation
- Scroll to the Maintenance heading and on the left-hand side menu and click System Settings
- In the Domain Name field, enter your Sender Domain -- that is, everything after @ in the email address you're sending from.
- For example: If sending from fred@yourorganization.com, the Domain Name is your organization.com.
- In the DKIM Selector, enter your unique DKIM Selector. The DKIM Selector is part of the DKIM Key that your Client Experience Manager provided for you to authenticate emails, and is everything before the first period.
- For example: If your DKIM key is
rs-em-301._domainkey.yourorganization.com, then the Selector isrs-em-301
- For example: If your DKIM key is
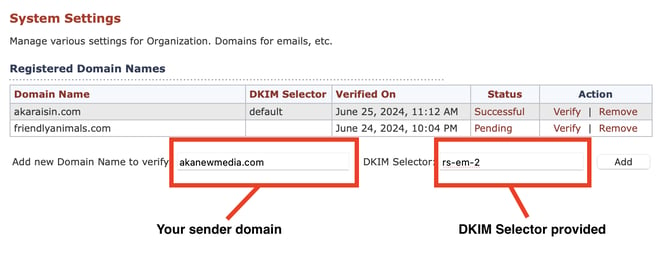
- Click "Add" to submit it for validation.
- A result, like so, will appear in the table above generated by MxToolBox - a leader in email deliverability.
- Success ✅: You're authenticated and good to go!
- Pending: The domain is awaiting authentication.
- Failed 🚫: Your domain failed SPF or DKIM authentication. Review the results that are generated below by MxToolBox for errors in red and resolve them in your DNS Settings. Common errors include:
- Too many SPF lookups: Your SPF record has more than 10 DNS Lookups. Mail servers only allow 10 lookups. Remove extraneous lookups or flatten the domain.
-
-
- Multiple SPF records: One domain should only have one SPF record for every SPF version.
- No DKIM record found: There's no DKIM selector associated with your domain. Check the syntax to make sure it's correct.
- After submitting your domain with a DKIM Selector, you may return at any point to re-validate it by clicking "Validate". This is important if your validation previously failed or you make changes at your DNS level.
-

New messages cannot be saved until a domain has been properly verified, but if you have already created and saved messages, they will not be prevented from sending. It's strongly recommended that your verify your domain in such cases. As Google and Yahoo have implemented stronger enforcement policies in February 2024, you can expect emails to be spammed outright unless SPF, DKIM and DMARC have been established on your domain. These are the responsibility of the domain sender - not raisin.
For existing clients: Removing domain names
System Settings will populate will all domains in the Sender Email (From) field of your emails. If the domains are no longer in use and no longer sending emails, perhaps from an old event, feel free to click "Remove" to remove them from your validation list.
Validate from the user profile
Emails sent to a constituent will be tracked in an "Email" tab of their user profile. If you're not sure that an email has been sent to a constituent, just follow these quick steps to check on its status:
- Navigate to the constituent from a Manage Users menu
- Click on their name to view their profile
- On the right-hand side, under Details, select "Emails"
- A table will appear with all e-mail messages that the user has received in the Event and their status:
- Opened: E-mail was opened by the recipient
- Successfully Sent: E-mail was sent, but not yet opened (or open was not tracked)
- Failed to Send: E-mail failed to send for technical reasons. Contact our support to investigate why.
With the exception of Scheduled Emails or Tax Receipts, e-mails that have been opened or Successfully Sent cannot be resent from the system.
Third-party verification
In addition to the tools in raisin to verify you domain, there are a host of third-party tools that you can use to verify what's been set in your DNS.
Checking your SPF Record
If you're not sure if your SPF has been been configured correctly, you can check if raisin has been added at: https://dmarcian.com/spf-survey/. Enter the domain without "https" or "www" in the address (e.g. foundationname.com) and expand the SPF record node to see if media2.akaraisin.com is listed).
Checking your DKIM key
After you've added your DKIM key and allowed 48 hours to elapse, here's a handy tool to inspect your DKIM record: https://dmarcly.com/tools/dkim-record-checker. Enter your domain and the selector that was provided to you in the Name, then validate.